Have you ever landed in a new city, hungry and excited, only to end up eating at a random place that wasn’t half as good as you hoped? We’ve all been there. That’s where a personalized food map comes in — your secret travel weapon for discovering local flavors that truly match your taste. Whether you’re a street food lover, a fine dining enthusiast, or someone who chases desserts across countries, knowing how to create a personalized food map before you travel can turn an ordinary trip into a culinary masterpiece.
Imagine walking through the streets of Rome with a list of the best hidden gelato shops mapped out for you. Or heading to Tokyo and already knowing where to find the best ramen bowl that fits your spice tolerance perfectly. That’s not just good planning — that’s travel done right. In this blog, we’ll guide you step by step on how to create your very own food map, customized to your cravings and curiosity. And who knows? By the end, you might just become the go-to food scout among your travel friends!
Why Creating a Personalized Food Map Changes Everything
When you plan your travels, you probably focus on flights, hotels, and sightseeing — but food is often left to chance. Yet, food is one of the most powerful ways to connect with a place. It tells stories about history, culture, and people. A personalized food map ensures that your culinary experience is as intentional as your itinerary. It saves you from tourist traps, helps you find authentic flavors, and even supports local vendors who pour their heart into every bite.
So why rely on luck when you can map your taste adventure? Whether it’s your first trip abroad or your tenth, a well-researched food plan transforms your journey into something deeper — something deliciously unforgettable.
Step 1: Understand Your Own Food Personality
Before you even open Google Maps, take a minute to understand what kind of eater you are. Do you enjoy experimenting with unusual ingredients, or do you prefer comfort food that reminds you of home? Your preferences shape how you build your personalized food map. For example, if you love spicy dishes, your map for Thailand will look very different from someone who prefers mild flavors. Think of this step as your “taste blueprint.”
Ask yourself: What do I crave the most when I travel? Is it desserts, street snacks, seafood, or vegan meals? Once you know, you’ll be able to focus your research on what truly excites you instead of wasting time scrolling through endless food options.
Step 2: Dive into Local Food Research
Creating a personalized food map before you travel starts with research. Dive into local food blogs, travel forums, YouTube vlogs, and social media hashtags. Look for reviews that highlight authenticity rather than just popularity. Remember, the most famous restaurant isn’t always the best — sometimes it’s that quiet stall tucked away in a narrow alley that serves magic on a plate.
Use Pinterest boards and Reddit threads to see what locals recommend. Websites like “Eater,” “Culture Trip,” or “The Infatuation” often list regional specialties and trending spots. Make a list of foods unique to your destination, such as Neapolitan pizza in Naples or street tacos in Mexico City. Each of these discoveries becomes a pin on your future map — one delicious dot at a time.
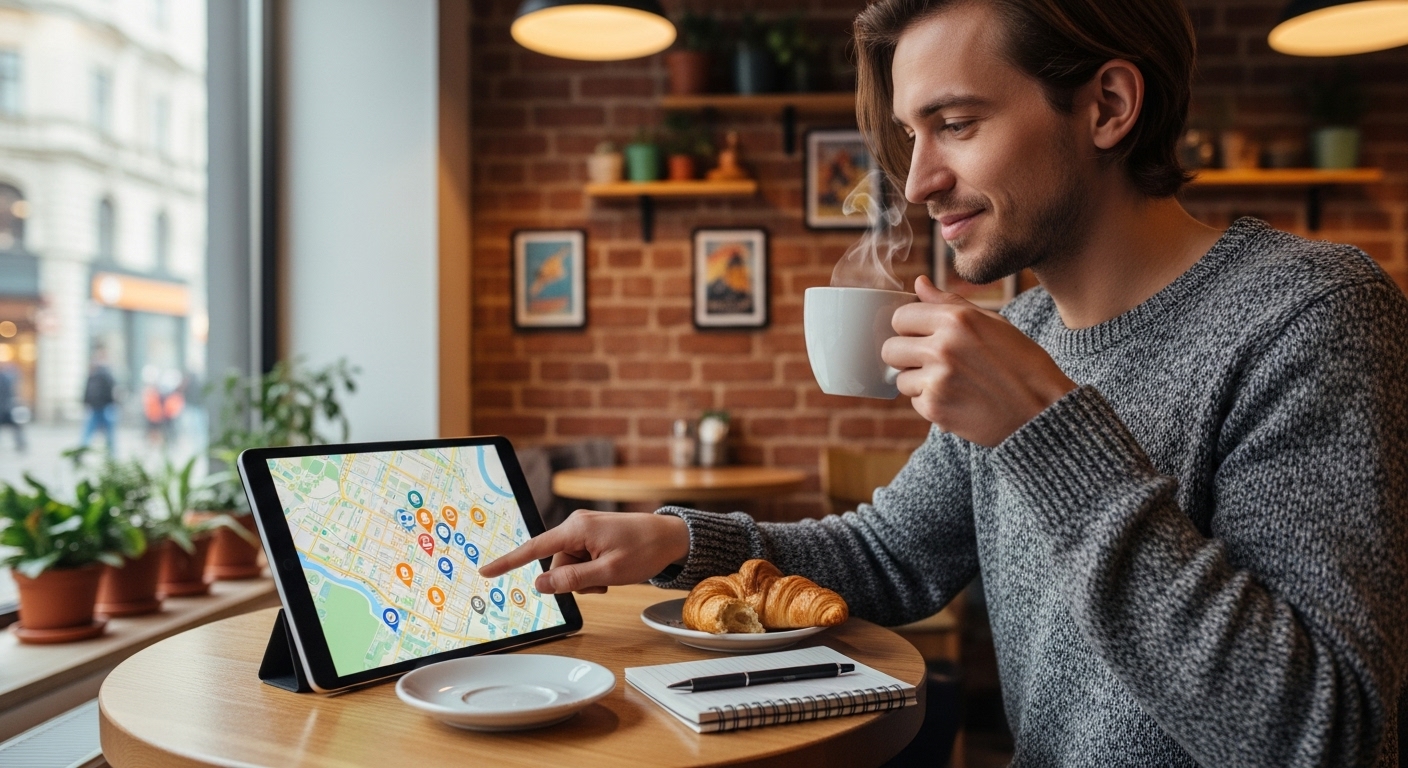
Step 3: Build Your Food Map Using Tools You Already Have
You don’t need fancy software to create your food map — Google Maps is your best friend here. Open Google Maps, sign in, and start creating a “Custom List” or “Starred Places.” Add each restaurant, café, and market you find interesting. You can even color-code the markers — red for restaurants, blue for dessert spots, yellow for street food, and green for coffee places.
Another great tool is “Notion” or “TripIt,” where you can integrate your map with notes, photos, and personal comments. That way, when you arrive at your destination, you have everything in one place — no fumbling between tabs or forgetting the name of that sushi bar you swore you’d try.
Step 4: Ask the Locals — Because They Know Best
Even the most detailed map can’t compete with local wisdom. Locals often know about hidden spots that never make it to travel blogs. Don’t hesitate to ask your Airbnb host, taxi driver, or barista where they eat. You’ll be surprised by how generous people are when sharing food tips. Adding these spontaneous discoveries to your personalized food map can lead to your most memorable meals.
Sometimes, the best restaurant isn’t even on the map yet — but you’ll find it by following the delicious smells coming from a small corner kitchen. Those moments can’t be planned, but they can definitely be added to your story (and your updated map for next time).
Step 5: Include Experiences, Not Just Restaurants
Don’t limit your map to eating spots. Think beyond restaurants — include cooking classes, food markets, local farms, and even food festivals. These experiences help you connect deeply with local culture. Imagine learning to make pasta from an Italian grandma in Florence or visiting a spice market in Istanbul — those are the kinds of memories that stay with you forever.
Your personalized food map becomes a collection of experiences — not just locations. It tells the story of your adventure through taste, smell, and emotion.

Step 6: Organize by Area and Timing
Once you’ve added your favorite spots, organize them by neighborhood and opening hours. This ensures that when you’re exploring, you don’t waste time backtracking. For example, if you’re visiting Paris, group your café stops in Montmartre for one morning and your bistro dinners in Saint-Germain for the evening. Efficient planning equals more eating and less commuting!
This step is especially useful when traveling with friends or family who may have different food interests. A structured food map lets everyone enjoy what they like — and still stick together for shared meals.
Step 7: Keep Room for Spontaneity
Yes, a personalized food map helps you plan, but don’t turn it into a rigid schedule. Leave space for unplanned discoveries. Sometimes, you’ll stumble upon a bakery that smells too good to ignore, or a street vendor with a long line of locals — trust those instincts. The best part of travel is that blend of planned perfection and spontaneous surprises.
Step 8: Keep It Updated and Share It!
Once you’ve created your food map, keep updating it during and after your trip. Note down what you loved, what didn’t live up to expectations, and what you’d recommend to others. Sharing your map with fellow travelers helps create a community of food lovers helping each other explore the world one bite at a time.
Wouldn’t it be amazing to inspire someone’s next meal across the world? By sharing your food adventures, you’re not just helping others — you’re preserving your own memories too.
When you return home, you might forget the exact route you took or the name of that museum, but you’ll never forget how that fresh pastry tasted at sunrise or how that local dish made you smile. That’s why learning how to create a personalized food map before you travel is more than a planning hack — it’s an act of storytelling through food.
So, what are you waiting for? Grab your phone, open your map, and start plotting your next flavor journey. Whether it’s a weekend getaway or a month-long adventure, your map of meals will make every destination come alive — one dish at a time.
We’d love to hear from you — what’s the most unforgettable meal you’ve had on your travels? Share your story in the comments below. And if you enjoyed this article, make sure to follow WentWorld.com on all our social media platforms for more travel inspiration, foodie tips, and cultural insights from around the world.
Catch up on the top stories and travel deals by subscribing to our newsletter!